|
|
|
This tutorial was made by Jimk, any questions or comments please direct them to Jimk.
In this tutorial I will show you how to make a flat ground with two different textures. If you repeat the process you will find that you can have as many textures for your object as you like. This method is for building your main level parts(ground, walls, terrain, ...) all in 3d max and then exporting them to revolt. Until we get a utility to combine PRMS using there center point you will have to make the majority, if not all of your level in 3dmax. Here we GO!
First we need a floor. To get this so the texture is not stretched we need to make square sections so the texture will repeat with the right height and width. To get this I select patch grid from the pull down menu.
Then select Quad Patch.
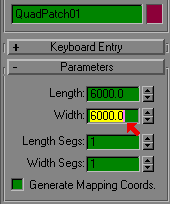
We are now ready to make our floor. Go to the top view and click and stretch, the grid should appear. Once you place it you will want to make sure the boxes are square, to do this enter equal amount in the height and width sections as demonstrated below.

This gives you six boxes 1000x1000. To increase the amount of boxes just change the Segs value in each category. Select your mesh and press modify as shown below. Then press the stack icon and select Editable Mesh.
Now is the time you would adjust vertices up or down for terrain features(hills, ramp, ditch...). Now that you have completed your level you will need to save and export it as one complete mesh. This is to get the NCP file for your completed mesh. Reset x form and collapse the stack. Then save as (levelname) and export as (levelname)ncp.prm. This is the only PRM that you will use to get a NCP file from. Now you are ready to separate the faces of your mesh into groups depending on the texture you want to map on it. For this example I am only using two textures but on your final level you can use as many as revolt will allow(a,b,c,d,e,f,g,h,i,j). Make sure you are still under modify and select Face as noted below.
Now select the faces you want to be mapped to a texture. For this example I will select all the faces I want to map using the Nhood1a.bmp texture. To select multiple faces hold down CTRL key when selecting. Make sure you have every face you want to be mapped to this texture and scroll down the menu till you see [detach] select it. When asked name the mesh for the texture you are going to use on it, Nhood1a in this case.
Now since I am only using two textures I will want to name the remainder of my faces Nhood1b, or what ever texture you are going to map to it. You should now have two separate meshes with the same center point. One is the nhood1a and the other is nhood1b. Now save your work as (levelname)detached.max. It is now time to texture your meshes. Load in (levelname)detached.max. if it is not already loaded. Select and delete all but the mesh named nhood1a. reset x form, collapse the stack.Remember DONOT change the center points of your models. This is very important when you place them in revolt. As you can see they both have the same center point for each mesh.
Now texture your mesh as you normally would and save as nhood1a.max This is the mesh you will load and edit if your textures need realigned or changed. When you are done reset x form, collapse the stack and export as nhood1a.PRM. Next repeat the same process for the remainder of meshes you have(reload (levelname)detached.max select and delete all meshes except nhood1b, reset x form, collapse the stack and texture, then save as nhood1b.max and export as nhood1b.PRM)
You now have the PRMS you need to put your level back together in revolt, but first we have to change the texture assignment by using rv-remap. Nhood1a is already assigned to the A BMP so the only one we need to change is Nhood1b.PRM. Change this from 0 to 1 so it will use the B BMP and then place the updated PRM along with the Nhood1a.PRM in your level folder that you are using for your level. The next step is very important. Since you did NOT make NCP file for these meshes they are not solid BUT the first mesh we exported(levelname)NCP.PRM has the solid geometry for the entire level. So we make a NCP file using this PRM and rename it to nhood1a.NCP then place this in your level folder but not the (levelname)NCP.PRM file. What this does is makes one solid NCP file for the multiple meshes that make up your level. That way you will not have any extra polys to get hooked on or cause problems when you drive over two textures.
It is now time to remove the old instance file from the original level( make a backup first ). Delete the nhood1.fin and the nhood1.fi file from your level folder. Now run revolt go to editing, select Instances, and load your level. Now hit F4 to enter editing mode and insert you meshes. VERY IMPORTANT! DONOT MOVE when you are inserting your meshes. Hit insert, select nhood1a, press enter, hit insert, select nhood1b, press enter. Do this for however many separate meshes you made and then save. Exit level(goto main menu) then goto your level folder by using ALT-TAB to get to desktop, and use RV-GLUE to glue your instances as your new level. Your command.txt file should look like this.create( nhood1 )
nhood1.fin
Now exit the folder, and ALT-TAB back into revolt, load your level and you should be able to drive around your new level.
Good Luck with your level creation.
JimK